Hi. Meet my new creation Grumble the Cactus! He is really charming small creature only 8 cm tall, but with a huge personality and real passion for gardening.

- LANGUAGE: English, German
- YARN: 20 g of 4ply yarn for cactus, and 20 g of DK yarn for pot
Hi. Meet my new creation Grumble the Cactus! He is really charming small creature only 8 cm tall, but with a huge personality and real passion for gardening.
Hello! Hello! I’m so glad to see you here!

I guess you came here because of the free pattern? That’s great, it’s mean you liked it! This pattern is really simple. For one fish, you’ll need only 6 gram of DK cotton yarn, two beads and probably 1 hour of your precious time. That’s it!
And here so many variety how you can use it! A key ring charm, home decoration or Christmas tree decoration. Do whatever you like and don’t forget to share your great Ideas!

And please don’t forget to support me by saying simple thank you!
So I’ll know you liked it, and I should carry on.
And it’s so simple to do, you can:
Thank you. I hope you’ll like my pattern. 🙂

This post all about my new Crochet/Sewing Pattern – Mouse the messenger.
Pattern can be downloaded in my Ravelry shop.
http://www.ravelry.com/patterns/library/mouse-messenger-pdf-crochet-pattern

It’s approximately 10 cm (4 inch) high and doesn’t take much time to make.

materials and tools needed for this project:
25g 85m of fingering/4 ply yarn
Material for trousers 14x6cm
Material for jacket 14×6 cm
Material for scarf 16x5cm
Piece of thin leather 12x5cm
Fibrefill
2 black beads 4mm
Chenille stem/Pipe cleaners
2mm (US B) crochet hook
Tapestry needle
Scissors
Stitch marker

Thank you for visiting my blog. I would love to hear your opinion.

It so nice to have pretty thing in your house, ofcuorse it is much better to have a pretty and useful thing in one. And absolute miracle to have pretty, useful things with bit of extra space them! 😉

For this project you will need:
Assembly
1- Take your tapestry needle and sew to short ends together (joining the 2 ends of the rectangle. You should get a tube like shape), sew it as tight as possible. Fastening off. Then sew a running stitch all the way around the edge of the tube and pull the running stitch tight.
2- Stuff the firmly, forcing it to stretch until the desired diameter.
3- Sew a running stitch all the way around the second edge of the tube and pull the running stitch tight to enclose the stuffing in the fabric tube.
4- Now take a needle and thread it with floss.
Tie a knot at the end and find your centre, push your needle ALL the way through until you reach your knot.
Then take your thread and go around to the other side and push your needle through again and pull ALL your embroidery floss through. Do this again opposite your last line.
Do that again and again, always going through your CENTER with the needle. I went around my cushion a total of 8 times. When you get to the last one tie the knot, to secure.
Don’t forget to fluff and shape your cushion.

5- Pull elastic through the button, and insert it in to the terracotta pot hole.
6- Pull elastic through the piece of the felt. Next sew elastic to the centre of the cushion. Last sew felt circle to cover ugly part, and don’t forget to sew the flower and button on the top of your cactuses.
Don’t forget to water it regularly! 😉
Pattern for the flower: Rnd 1: All flower we will work in magic loop. (3 ch, 3 tr, 3 ch, slst) 5 times, tighten the loop. Fasten off. Leave a long tail to attach flowers to the body.


This year I take a part in few Christmas fair, so you can imagine piles of unsold stuff lying on my kitchen worktop! 🙂 One of those piles was Christmas tree ornaments, this year I made 20 of those, and haven’t sold not a single one! So I decided to use them somehow. And here what I did. Looks good, and really easy to make.
Pattern:

Rnd 1: Crochet around the ring using the single crochet stitch. And keep crocheting all way around the ring, keep pushing stitches close together. When you done slip stitch in the first stitch of the round.
Rnd 2: (5 chains, single crochet in next stitch)continue in this manner till the end.
Sew few beads, and wrap your presents! 🙂
And please have a best ever Christmas!
Love you all and I’ll see you next year!
Tais.


Hello.
It’s November 6th and it means what only 48 days and 11 hours left till Christmas! So I started to think about it in advance and I made one easy and cute Crochet Pattern- Christmas cats Ornaments.

I’m really happy with a result now when it’s finished, but I’ll tell you the truth I struggled a bit in the beginning.
And my biggest problem was a decreasing part of the cat’s body. So first time in my life I tried an invisible decrease but it didn’t look right. So I invented something new!
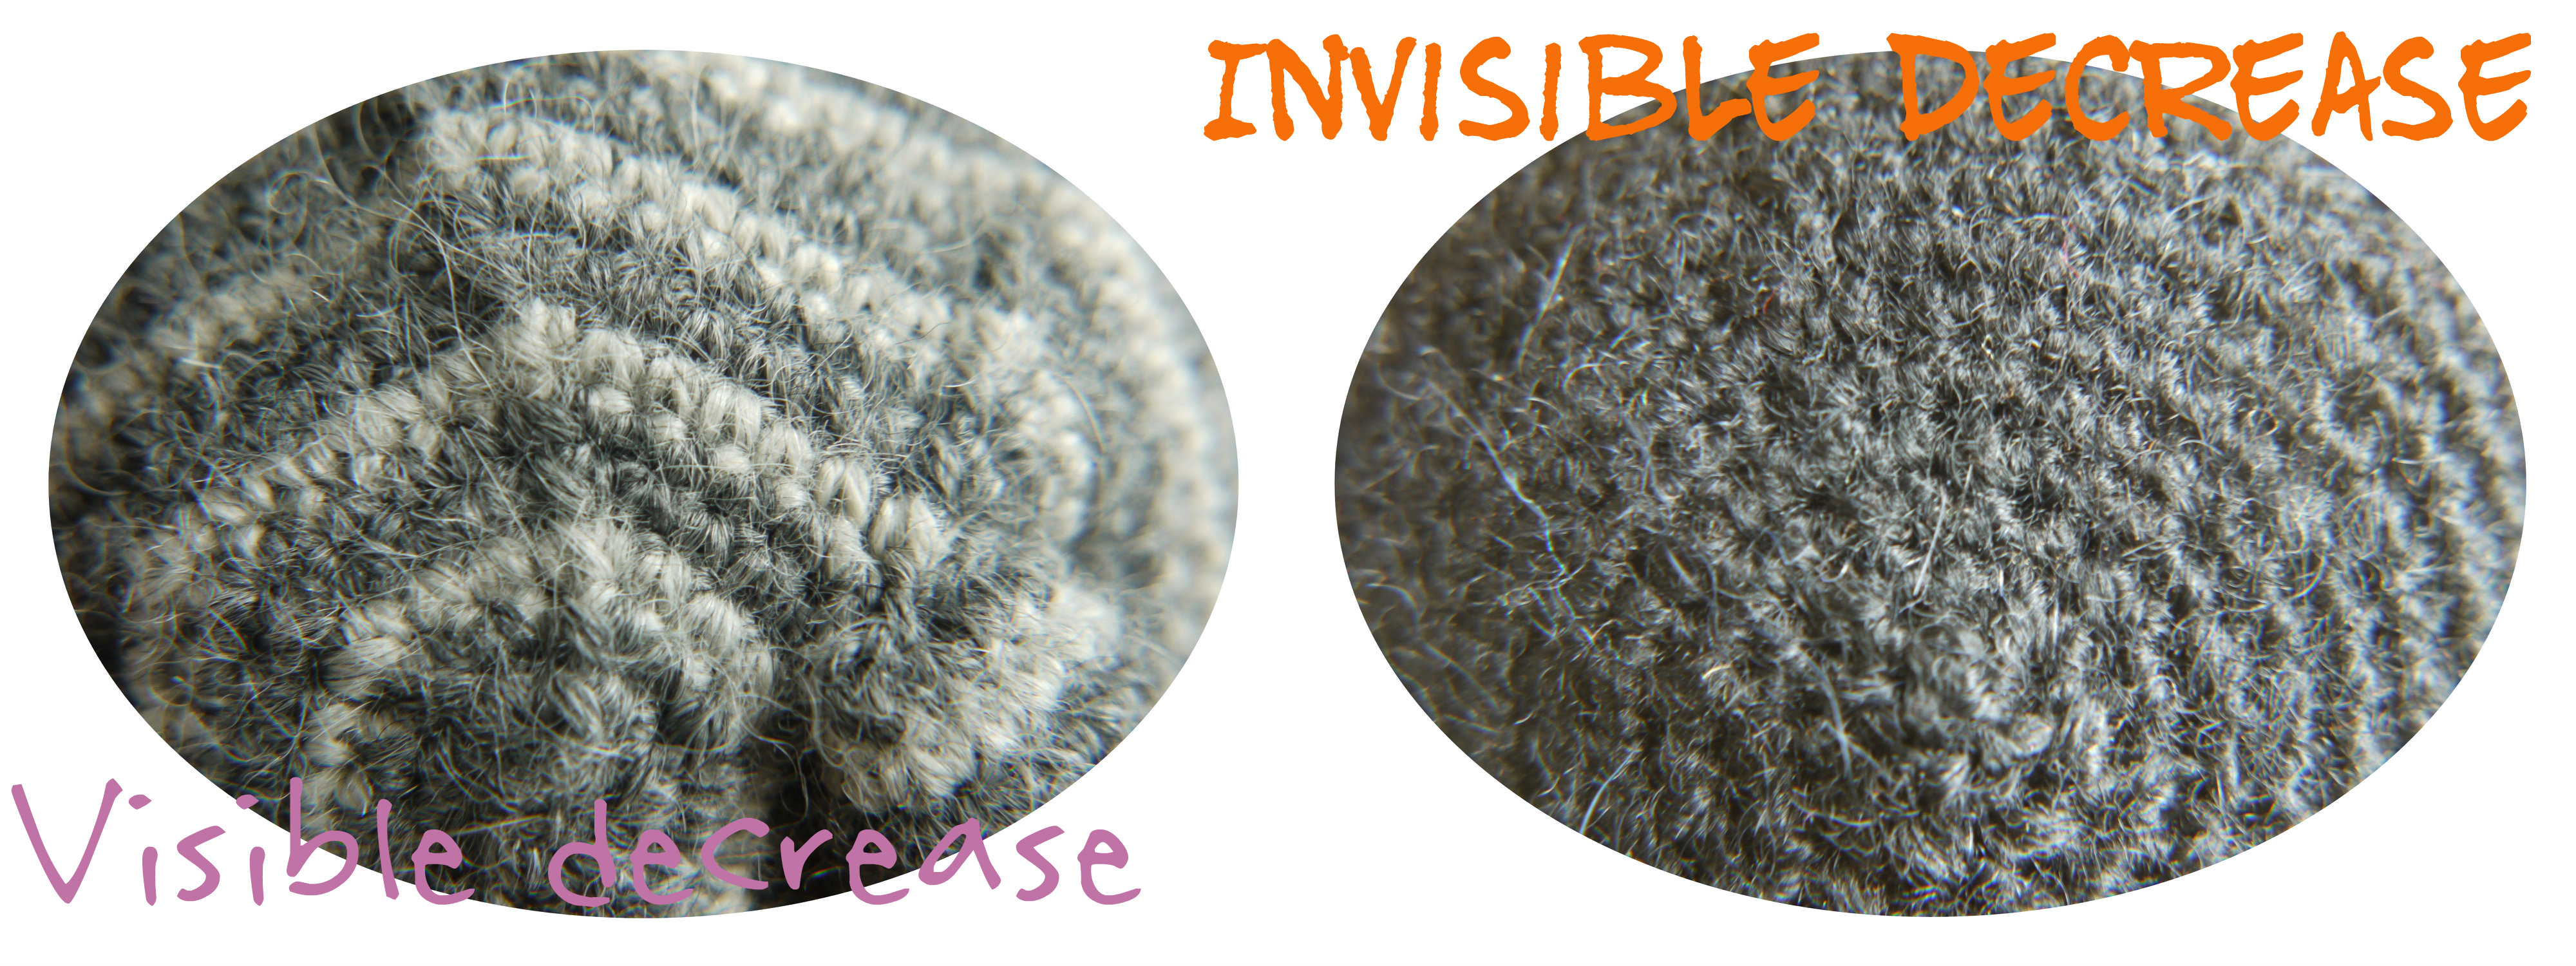
As you can see on a first picture decreasing line is visible and it’s because each and every decrease goes right under the previous round decreases, so all what we have to do is to break this line.
And it’s really easy to achieve. All you have to do, you need to replace a decreasing part in your pattern with a pattern below according to stitch quantity. So for example you have 48 stitches you need to follow the pattern from round 5. If you have 72 stitches start from round 1. And so on!
Rnd 1: (1 dec, 10 sc) 6 times: 66 sts
Rnd 2: 5 sc (1 dec, 9 sc) 5 times, 1 dec, 4 sc: 60 sts
Rnd 3: (1 dec, 8 sc) 6 times: 54 sts
Rnd 4: 4 sc (1 dec, 7 sc) 5 times, 1 dec, 3 sc: 48 sts
Rnd 5: (1 dec, 6 sc) 6 times: 42 sts
Rnd 6: 3 sc (1 dec, 5 sc) 5 times, 1 dec, 2 sc: 36 sts
Rnd 7: (1 dec, 4 sc) 6 times: 30 sts
Rnd 8: 2 sc (1 dec, 3 sc) 5 times, 1 dec, 1 sc: 24 sts
Rnd 9: (1 dec, 2 sc) 6 times: 18 sts
Rnd 10: 1 sc (1 dec, 1 sc) 5 times, 1 dec: 12 sts
Rnd 11: 6 dec: 6 sts
Contact me if you have any sort of questions or suggestions!
I hope I was useful. 🙂
Hello.
I have a new pattern in my store – Coins Purse or Sewing Necessaire

In this pattern I used a bit unusual technique, I hope I invented something new! 🙂
In round 3 in the border part I worked single crochet stitch with a beige colour and double
crochet stitch with a blue colour yarn.
On a pictures below you can see how exactly you have to swop a yarn to get that pretty dotty effect.

Meet my new creation the purple dragon!
 I love dragons. And always wanted to make one. But frankly then I started this project, I started it not as a dragon toy project, no I actually been thinking about the dog rather then a dragon! 🙂

First of all I’ll tell you a bit about it. The dragon will be approximately 20 cm (8 inches) high.
You’ll need 155g of fingering yarn and 2mm crochet hook. Plus 20g of any DK yarn and 2,5 mm crochet hook to make a head base. Last thing 2 black safety eyes 11mm (0.7inch), and I thing thet all you need to make this toy.

And the last but most important thing I left till the end!
You can buy this pattern with 50% off in my Ravelry shop!
Coupon code is viewpost
http://www.ravelry.com/patterns/library/dragon-toy-pdf-crochet-pattern

I am thinking about a CLOUD! I’m thinking about white single cloud in the sky! Usually my country is covered by thick layer of grey cloudy mass, and it sad and it is a bit boring. So today I’m starting a new project all about a clear sky and single cloud!
SO WE WILL NEED: 75 g of white DK yarn, 2.5 mm crochet hook, polyester fiberfill , 20g of DK yarn four different colours, pins, needle, scissors.

Now you have to decide which cloud you like most! If you will go for cloud number one you need to make only five bubbles, but for cloud number two and three you need seven bubbles. Decisions, decisions!

Pattern for bubble.
Rnd 1: With main colour yarn.6 sc in the yarn loop and tighten the loop: 6 sts
Rnd 2: 6 inc: 12 sts
Rnd 3: ( inc, sc) 6 times: 18 sts
Rnd 4: ( inc, 2 sc) 6 times: 24 sts
Rnd 5: ( inc, 3 sc) 6 times: 30 sts
Rnd 6: ( inc, 4 sc) 6 times: 36 sts
Rnd 7: ( inc, 5 sc) 6 times: 42 sts
Rnd 8: ( inc, 6 sc) 6 times: 48 sts
Rnd 9 – 13: sc in each st around: 48 sts
Rnd 14: (6 sc, dec) 6 times: 42 sts
Rnd 15: (5 sc, dec) 6 times: 36 sts
Rnd 16: (4 sc, dec) 6 times: 30 sts
Rnd 17: (3 sc, dec) 6 times: 24 sts
Rnd 18: (2 sc, dec) 6 times: 18 sts, Stuff bubble now
Rnd 19: (1 sc, dec) 6 times: 12 sts
Rnd 20: 6 dec 6: 6 sts
Fasten off. Thread tail through stitches of last round, pull tight, and secure.
Ok! Now we are ready to make some rain drops! And again if you are making cloud number one and two you need only 5 rain drops (three long and two short), for cloud number three you will need seven raindrops (four long and three short).
Pattern for raindrops
Rnd 1: 6 sc in the yarn loop and tighten the loop: 6 sts
Rnd 2: 6 inc: 12 sts
Rnd 3: Sc in each st around: 12 sts
Rnd 4: (inc,sc) 6 times: 18 sts
Rnd 5: (7 sc, dec) 2 times: 16 sts
Rnd 6: (6 sc, dec) 2 times: 14 sts
Rnd 7: (5 sc, dec) 2 times: 12 sts
Rnd 8: (4 sc, dec) 2 times: 10 sts
Rnd 9: (3 sc, dec) 2 times: 8 sts, stuff raindrops now.
Rnd 10: (2 sc, dec) 2 times: 6 sts
Rnd 11: ( sc, dec) 2 times: 4 sts
Rnd 12: 2 dec: 2 sts
Rnd 13: sl st two remaining sts, make a chain of 20 ch for short raindrops, and 30 ch for long rain drops.
I’m making cloud number two, so in total I made seven bubbles, and five raindrops, my cloud ready for assemble.

I decided to go for cloud number two, so to make it you need first sew five bubbles together, and then sew two bubbles on a top. Last thing you have to do is to sew the raindrops, a long drop goes on a bubble, and a short drop goes between the bubbles.

Patter available for free in my Ravelry shop :
